Reviewed by Josh G.
Verified Buyer
I recommend this product
So good
Incredible bike!
Loading...
Was this helpful?
SALE $2,399 $3,599 $3,599
Want to see what it looks like in your space? Click the AR button above!
This product is available to see in 3D and true to scale so you can make sure it's just the right fit, design, and functionality for your life.
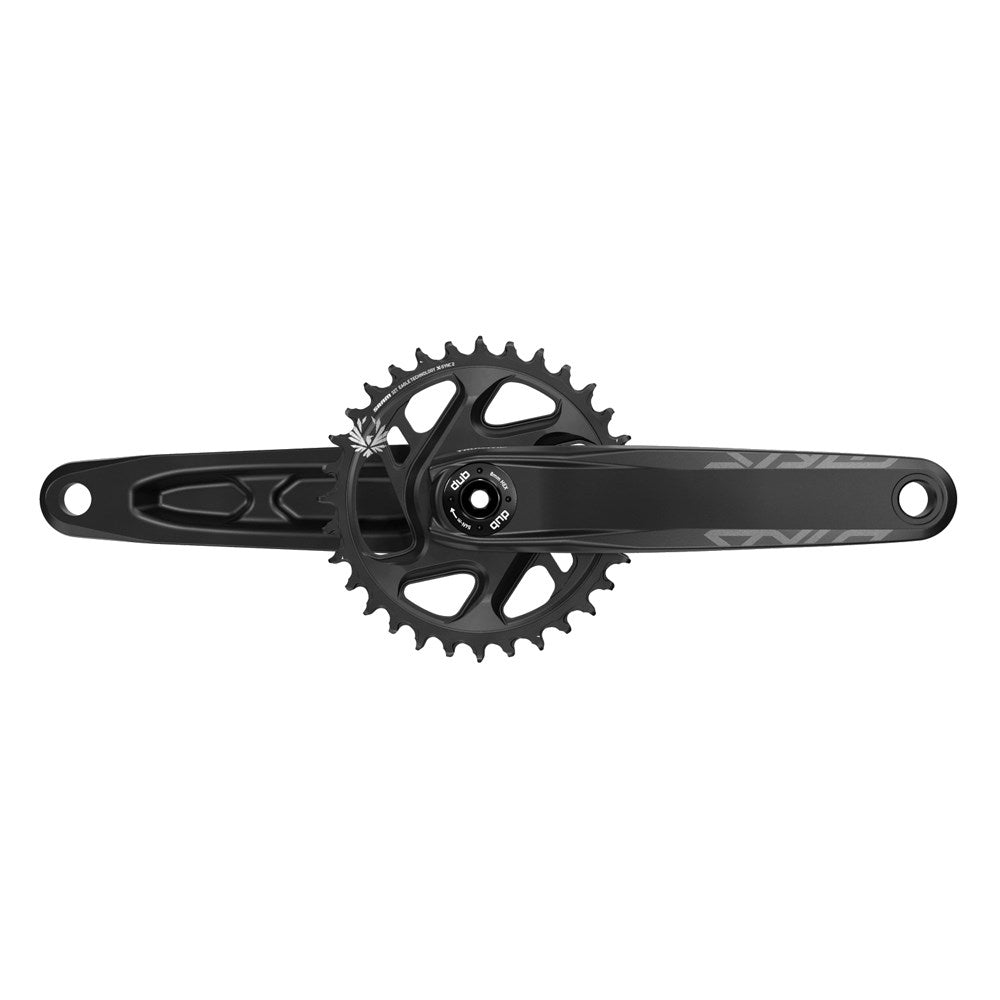
SRAM Stylo Eagle, B148, DUB, 170mm, 32t

SRAM XG1275, 12-speed, 10-52t
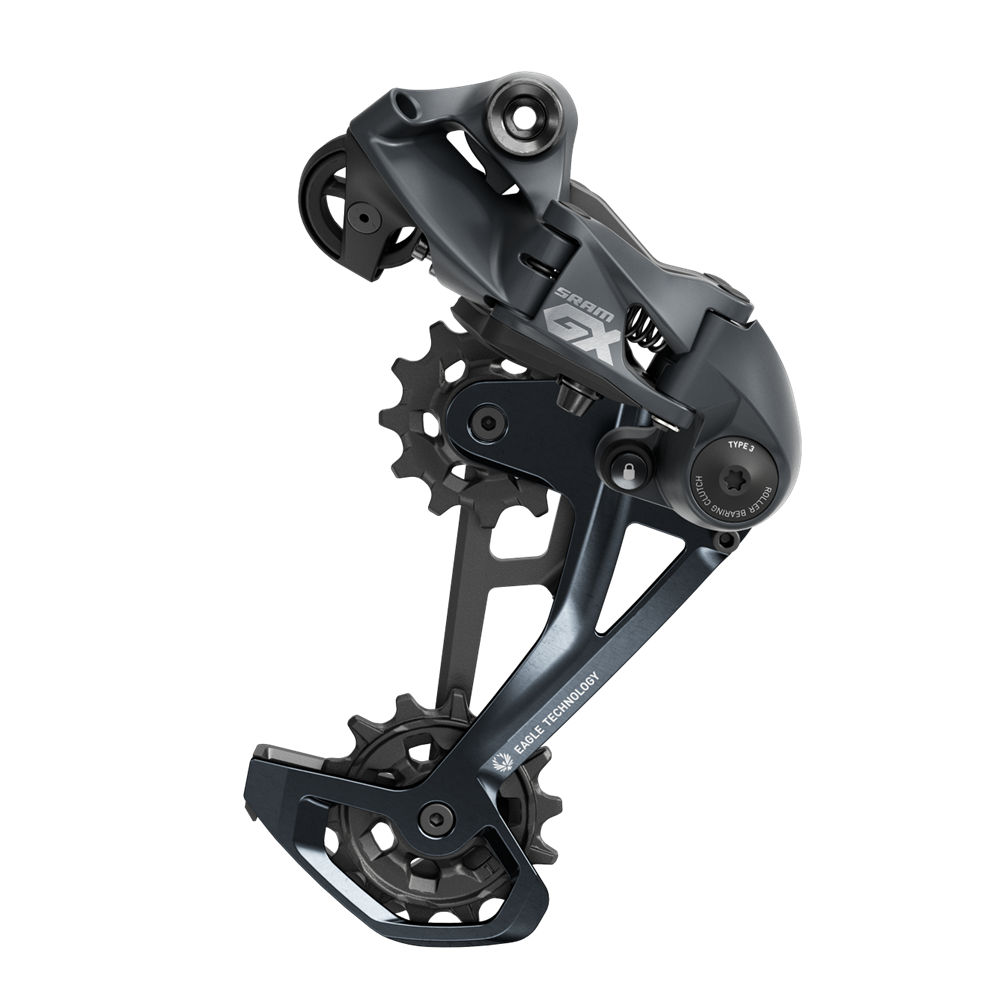
SRAM GX Eagle, 12-speed
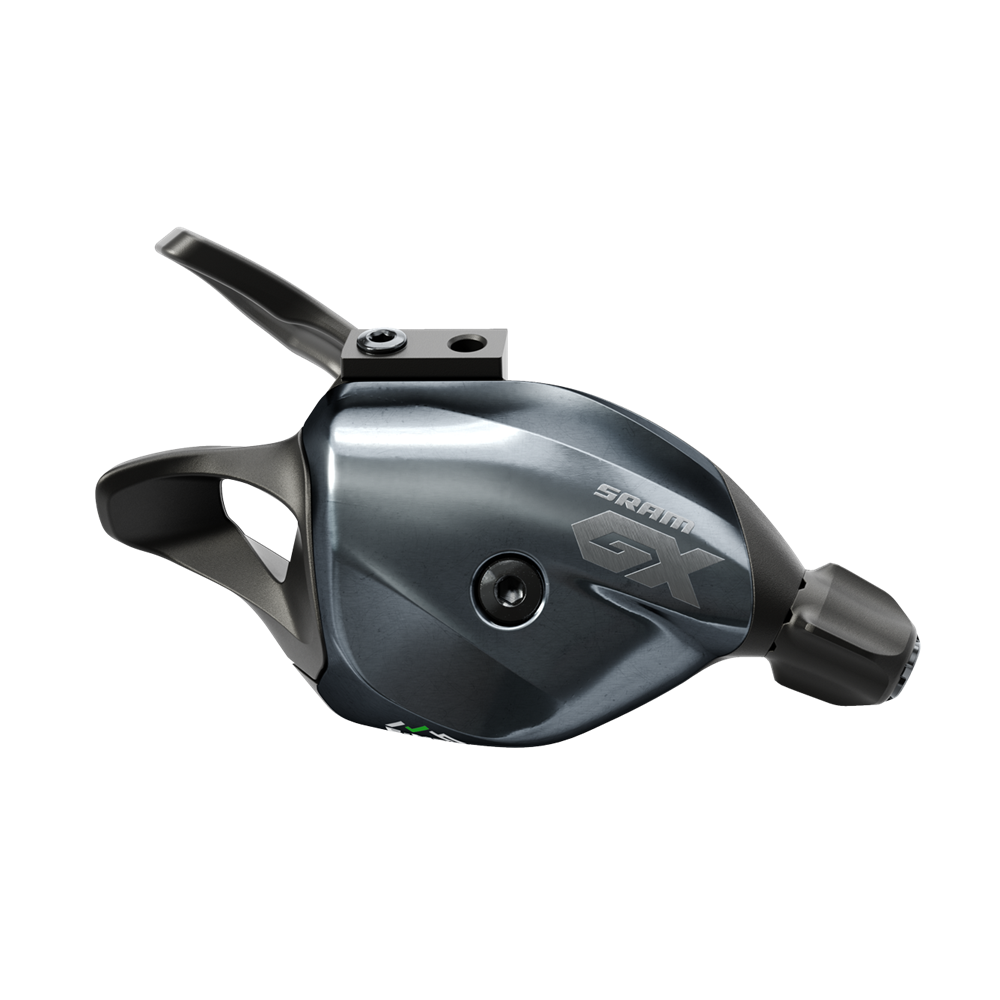
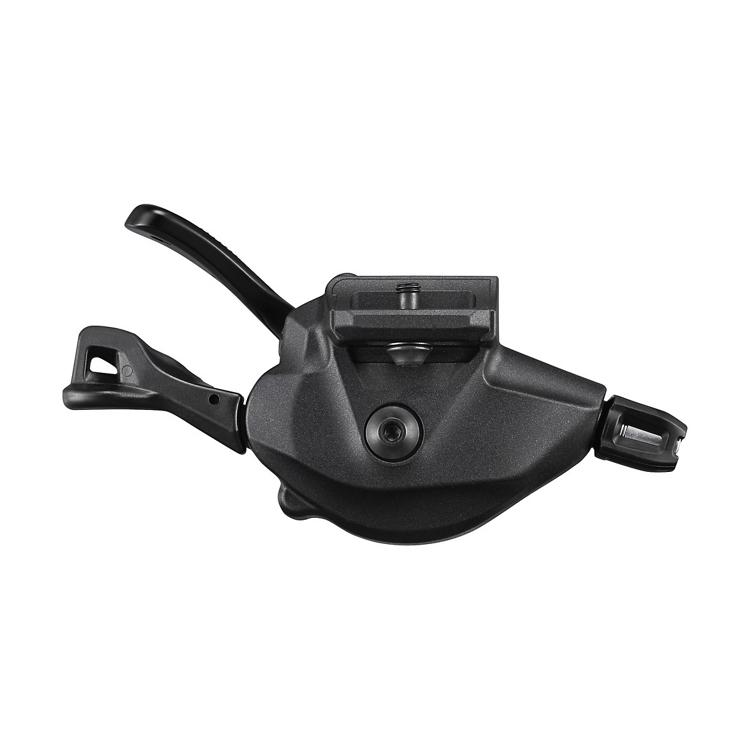
SRAM GX Eagle Lunar 12-speed, Trigger
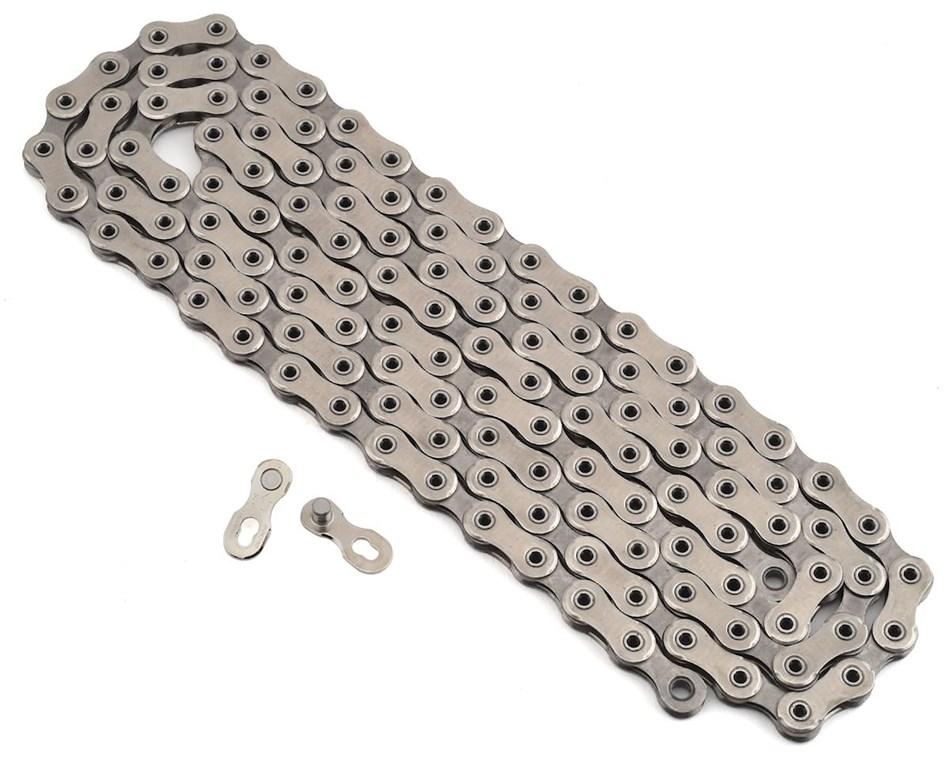
SRAM GX Eagle
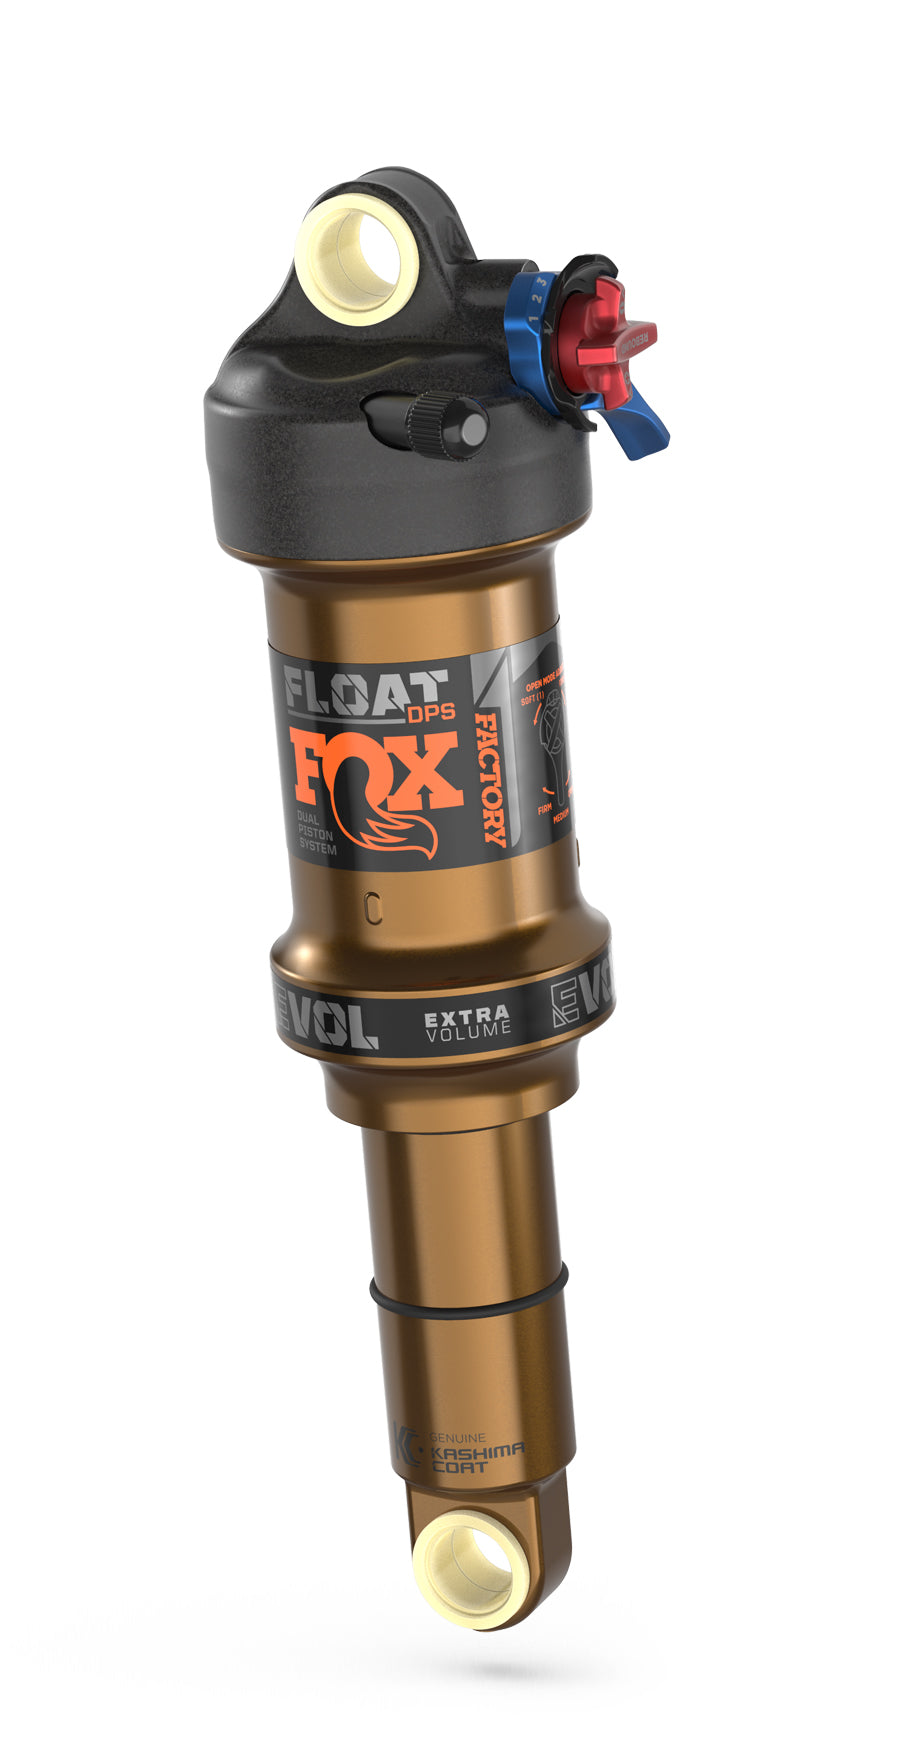
Fox Factory Float DPS EVOL LV, 3 Pos. Adj., 230x57.5
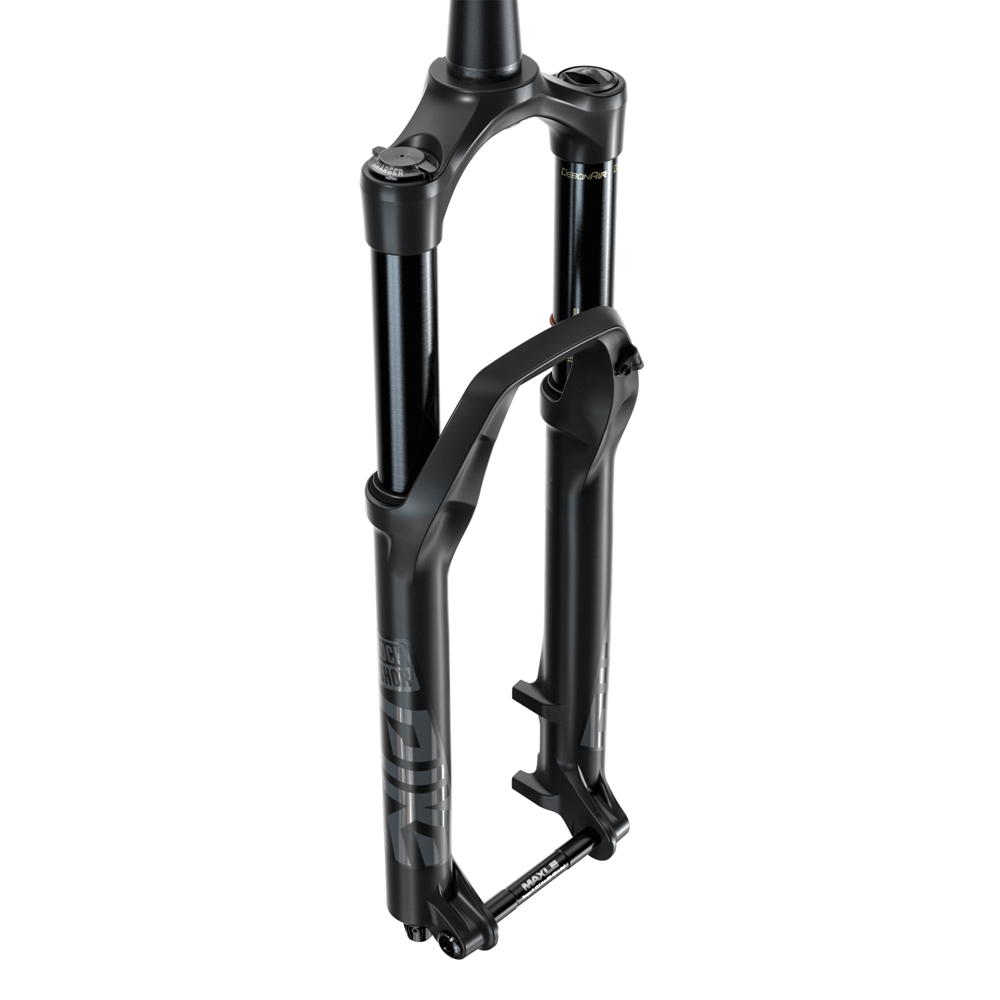
RockShox PIKE Select RC, 29, 140mm, 42mm rake, Boost
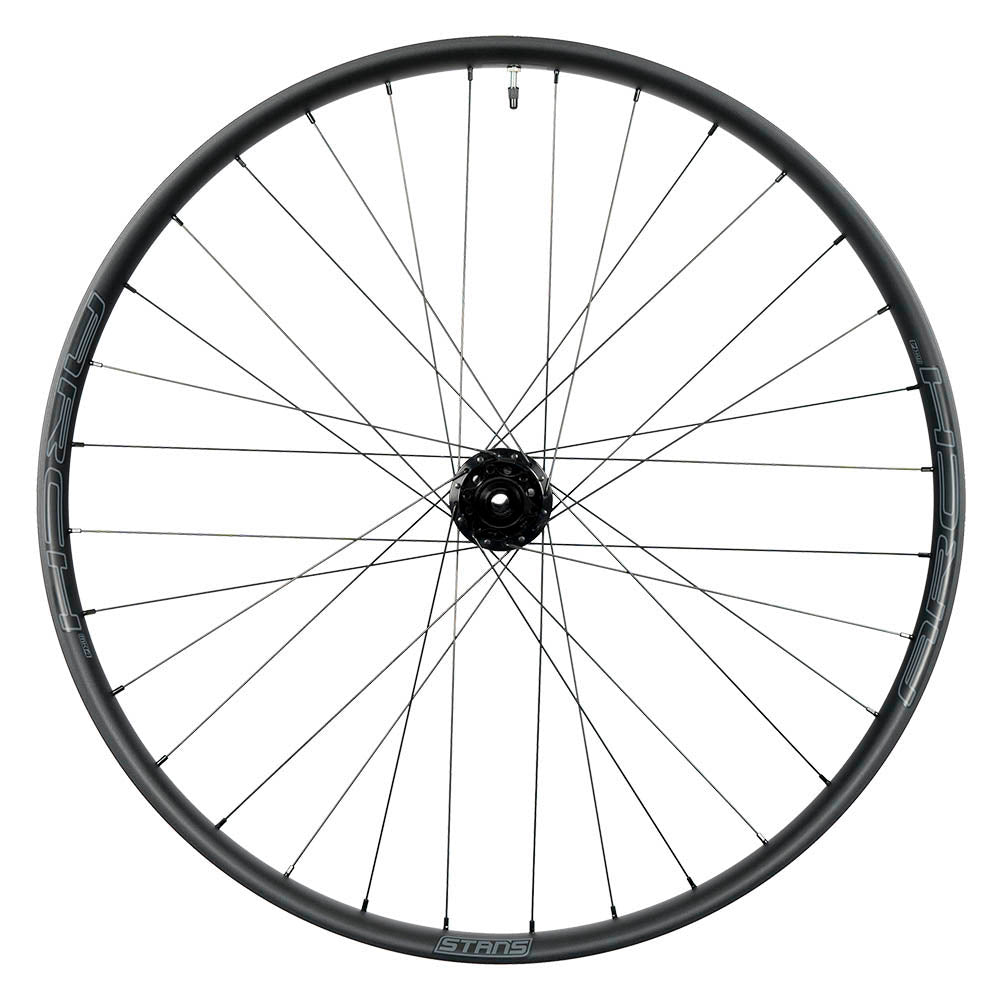
Stan's Arch S2 Pro 29, Tubeless, Boost 15x110, 6-bolt
Stan's Flow S2 27.5+, Tubeless, Boost 15x110, 6-bolt
Stan's Arch S2 Pro 29, Tubeless, Boost 12x148, XD, 6-bolt

Stan's Flow S2 27.5+, Tubeless, Boost 12x148, XD, 6-bolt
Cane Creek 40, ZS44/ZS56 ZS44 upper, ZS56 lower
SRAM G2 R, 4-piston, 180mm, Centerline, 6-bolt rotor
SRAM G2 R, 4-piston, 180mm, Centerline, 6-bolt rotor
Race Face Aeffect, 35 x 50mm
RaceFace Aeffect R, 35mm, XL/LG 780mm, MD 760mm, SM 760mm, 20mm rise, Alloy
Ergon GXR
BikeYoke Revive 185mm for XL and Large, 160mm for Medium, 125mm for Small, Internal, 31.6
SDG Bel-Air V3
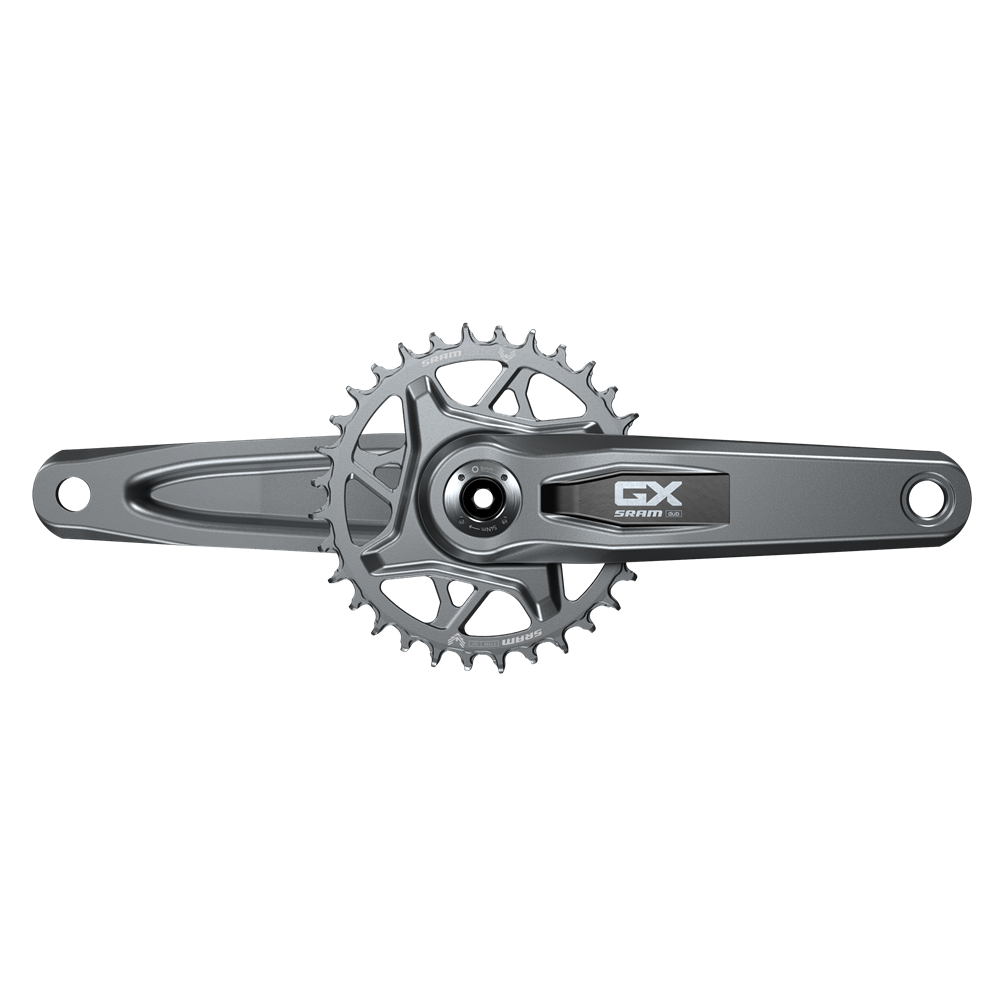
SRAM GX Eagle Transmission, B148 DUB, 170mm, 32t
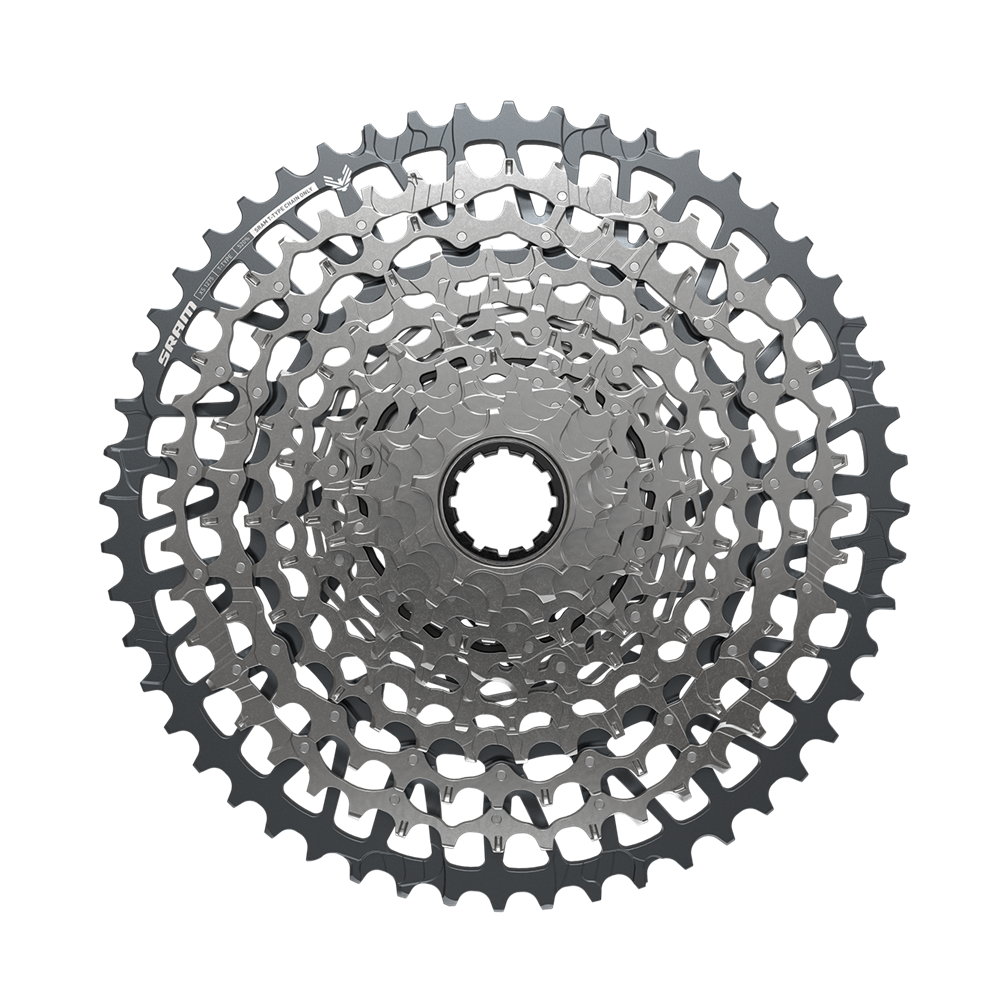
SRAM GX Transmission XG1275, 12-speed, 10-52t

SRAM GX Eagle AXS Transmission, Hangerless, Wireless, 12-speed
SRAM Eagle AXS Rocker Controller
SRAM GX Eagle, Flattop, Silver
Fox Factory Float DPS EVOL LV, 3 Pos. Adj., 230x57.5
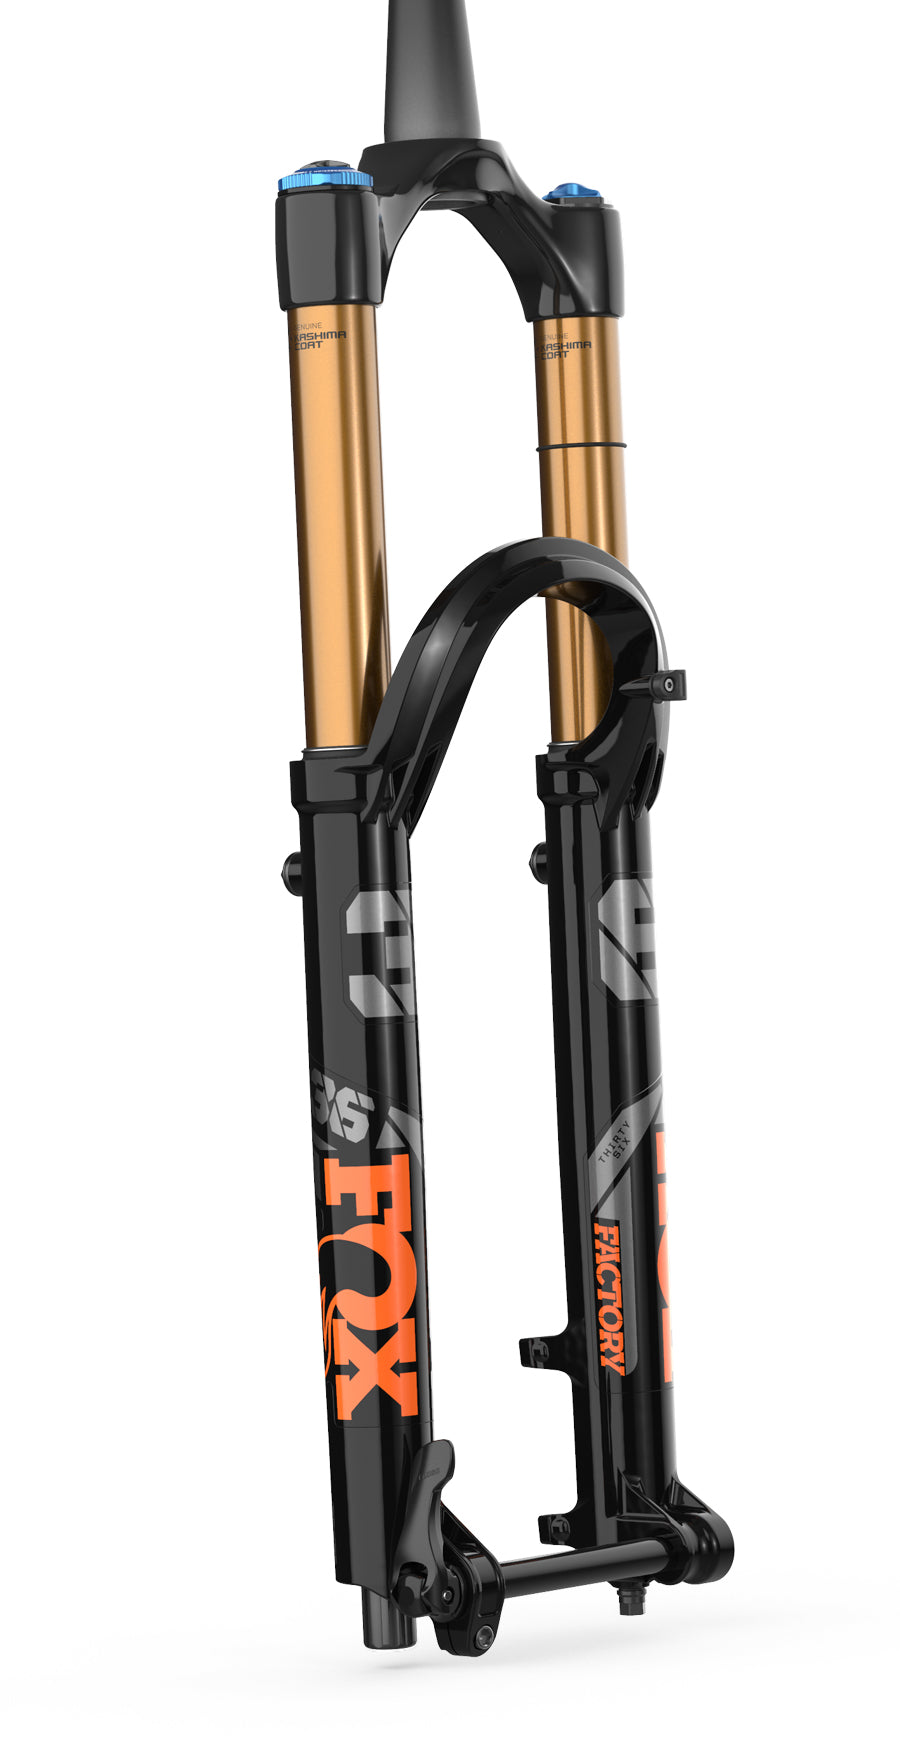
Fox Factory 36 Float, 29, 140mm, Grip 2, HSC, LSC, HSR, LSR, 44mm rake, Boost
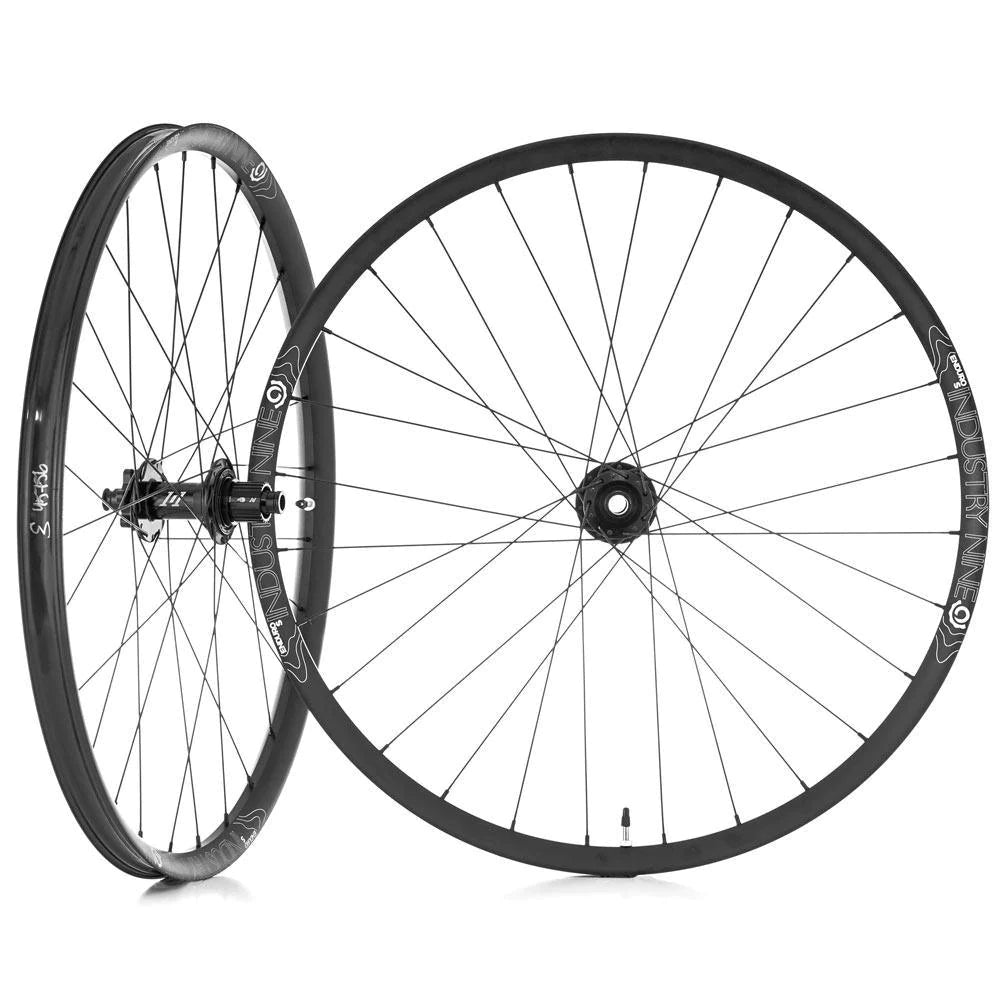
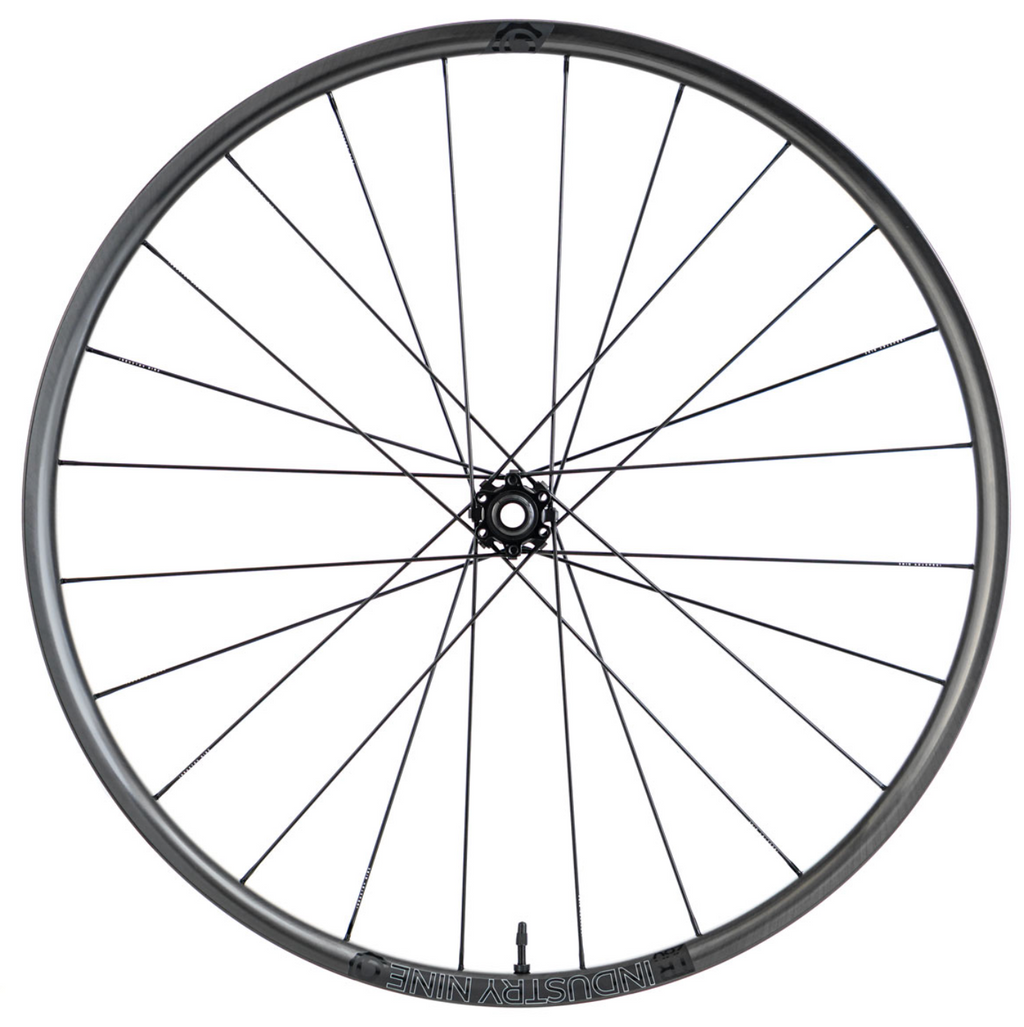
Industry Nine Enduro S 29, 1/1 hub, Tubeless, Boost 15x110, 6-bolt
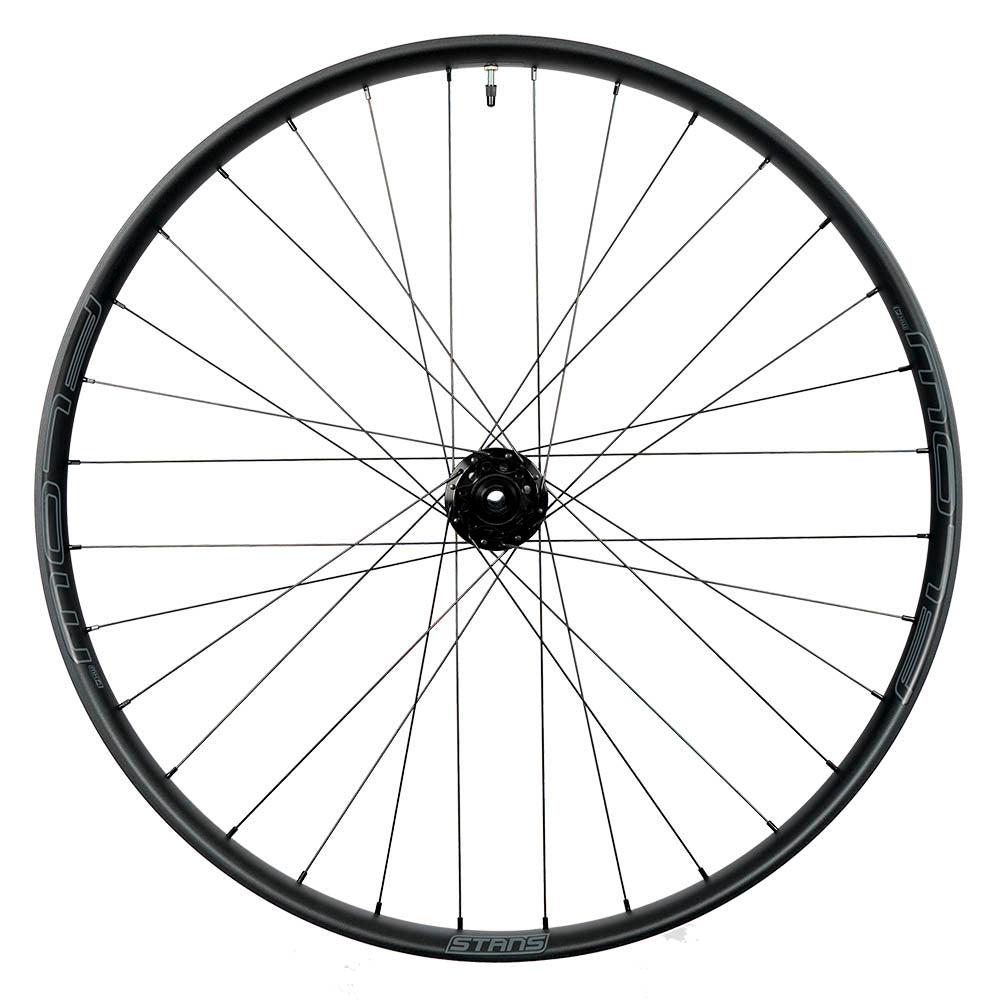
Stan's Flow MK4 27.5+, Tubeless, Boost 15x110, 6-bolt
Industry Nine Enduro S 29, 1/1 hub, Tubeless, Boost 12x148, XD, 6-bolt

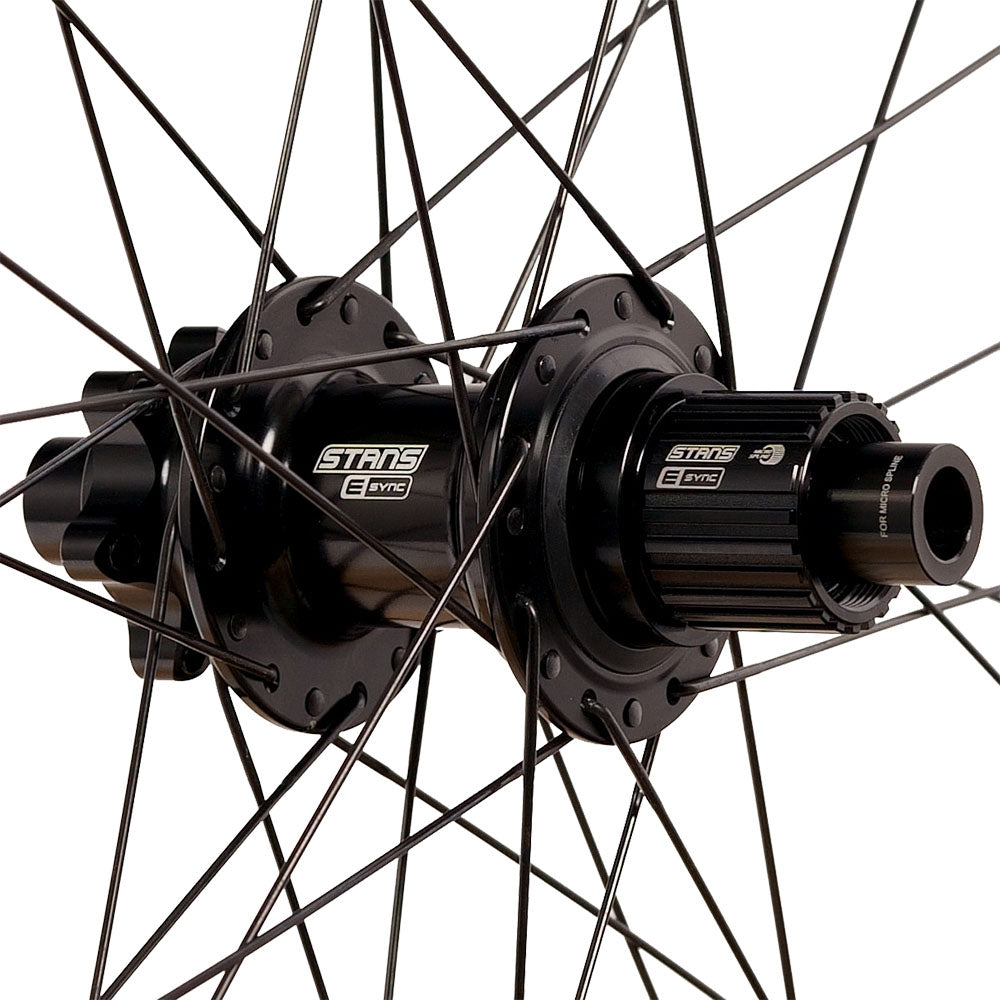
Stan's Flow MK4 27.5+, E-Sync, Tubeless, Boost 12x148, XD, 6-bolt
Cane Creek 40, ZS44/ZS56 ZS44 upper, ZS56 lower
SRAM G2 RSC, 4-piston, 180mm, Centerline, 6-bolt rotor
SRAM G2 RSC, 4-piston, 180mm, Centerline, 6-bolt rotor
Race Face Turbine R, 35 x 50mm
OneUp, 35mm, XL 800mm, LG 780mm, MD 760mm, SM 760mm, 20mm rise, Carbon
Ergon GXR
BikeYoke Revive 185mm for XL and Large, 160mm for Medium, 125mm for Small, Internal, 31.6
SDG Bel-Air V3
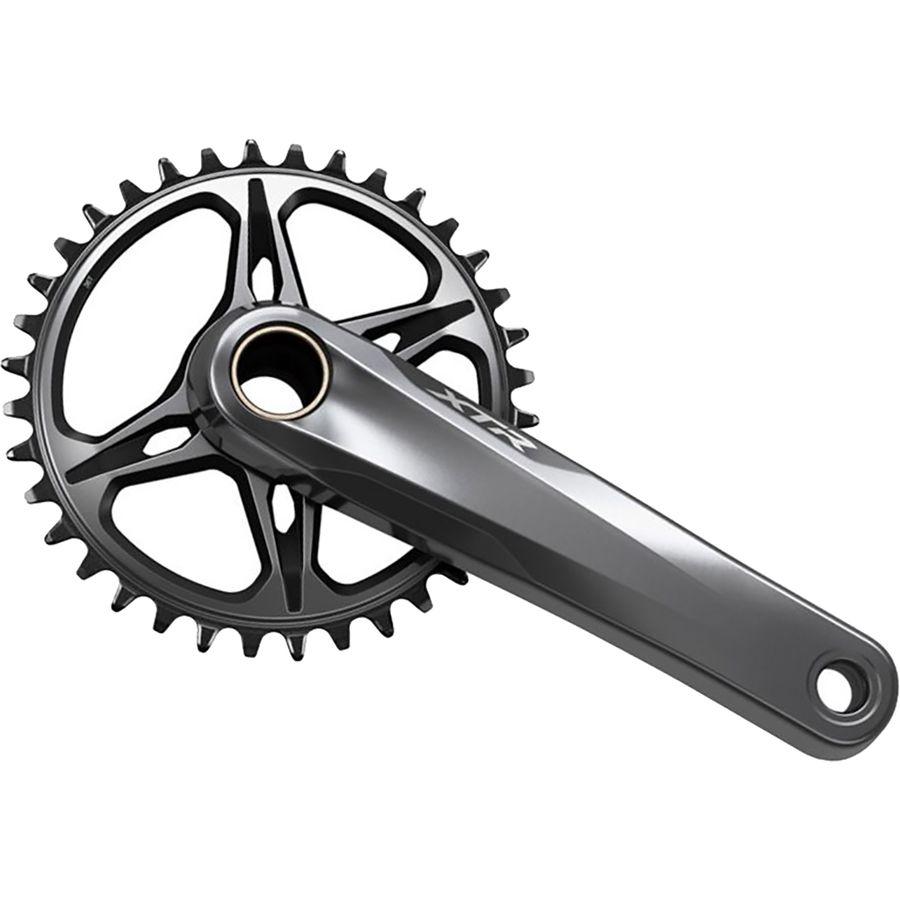
Shimano M9120 XTR, 170mm, 32t
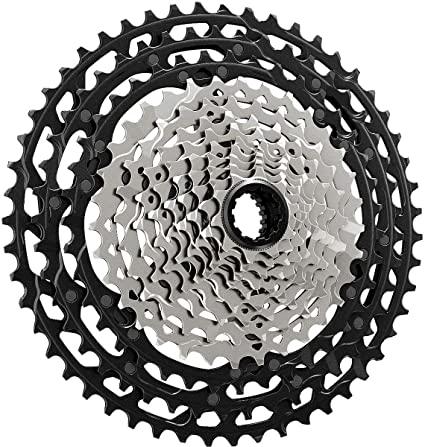
Shimano XTR 9100, 12-speed, 10-51t
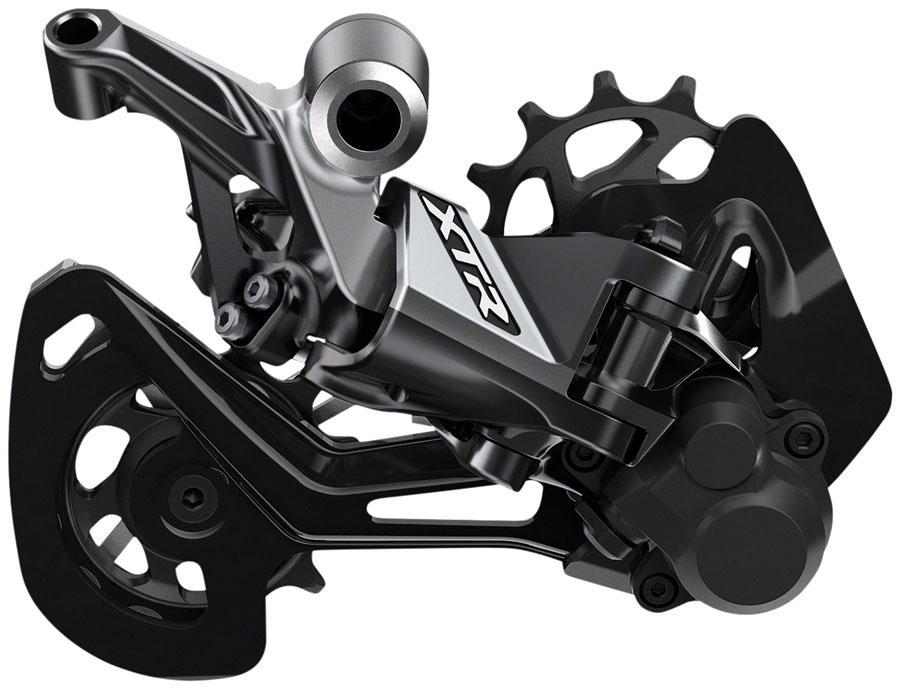
Shimano XTR 9100, 12-speed
Shimano XTR 9100, 12-speed, Rapidfire Plus
Shimano XTR 9100
Fox Factory Float DPS EVOL LV, 3 Pos. Adj., 230x57.5
Fox Factory 36 Float, 29, 140mm, Grip 2, HSC, LSC, HSR, LSR, 44mm rake, Boost
Industry Nine TR300/290 DUO 29, 24h, Tubeless, 6-Bolt, Boost 15x110
27.5+: Industry Nine EN355 27.5, 32h, Tubeless, 6-Bolt, Boost 15x110
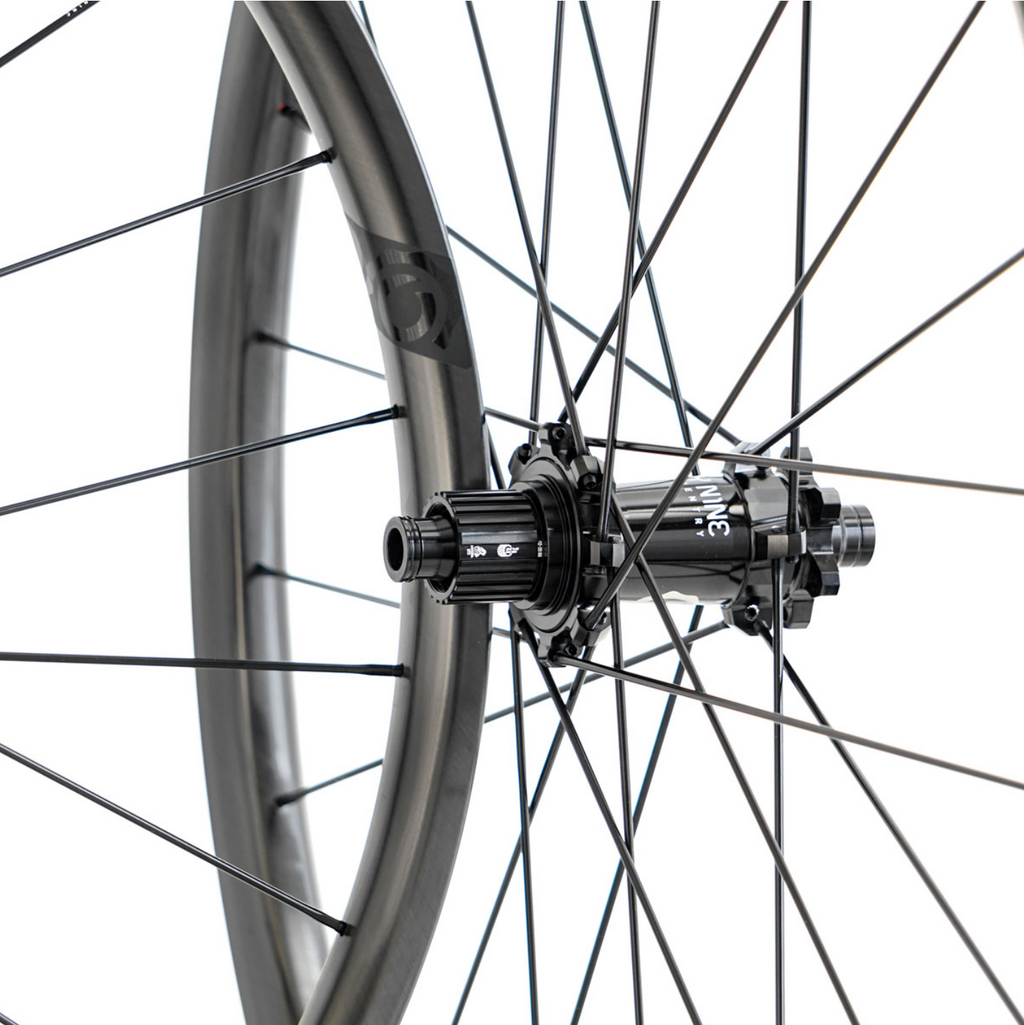
Industry Nine TR300/290 DUO 29, 24h, Tubeless, Microspline, 6-Bolt, Boost 12x148
27.5+: Industry Nine EN355 27.5, 32h, Tubeless, Microspline, 6-Bolt, Boost 12x148
Cane Creek 40, ZS44/ZS56 ZS44 upper, ZS56 lower
Shimano XTR 9120, 4-piston, 180mm, 6-bolt rotor
Shimano XTR 9120, 4-piston, 180mm, 6-bolt rotor
Race Face Turbine R, 35 x 50mm
OneUp, 35mm, XL/LG 800mm, MD 760mm, SM 760mm, 20mm rise, Carbon
Ergon GXR
BikeYoke Revive 185mm for XL and Large, 160mm for Medium, 125mm for Small, Internal, 31.6
SDG Bel-Air V3
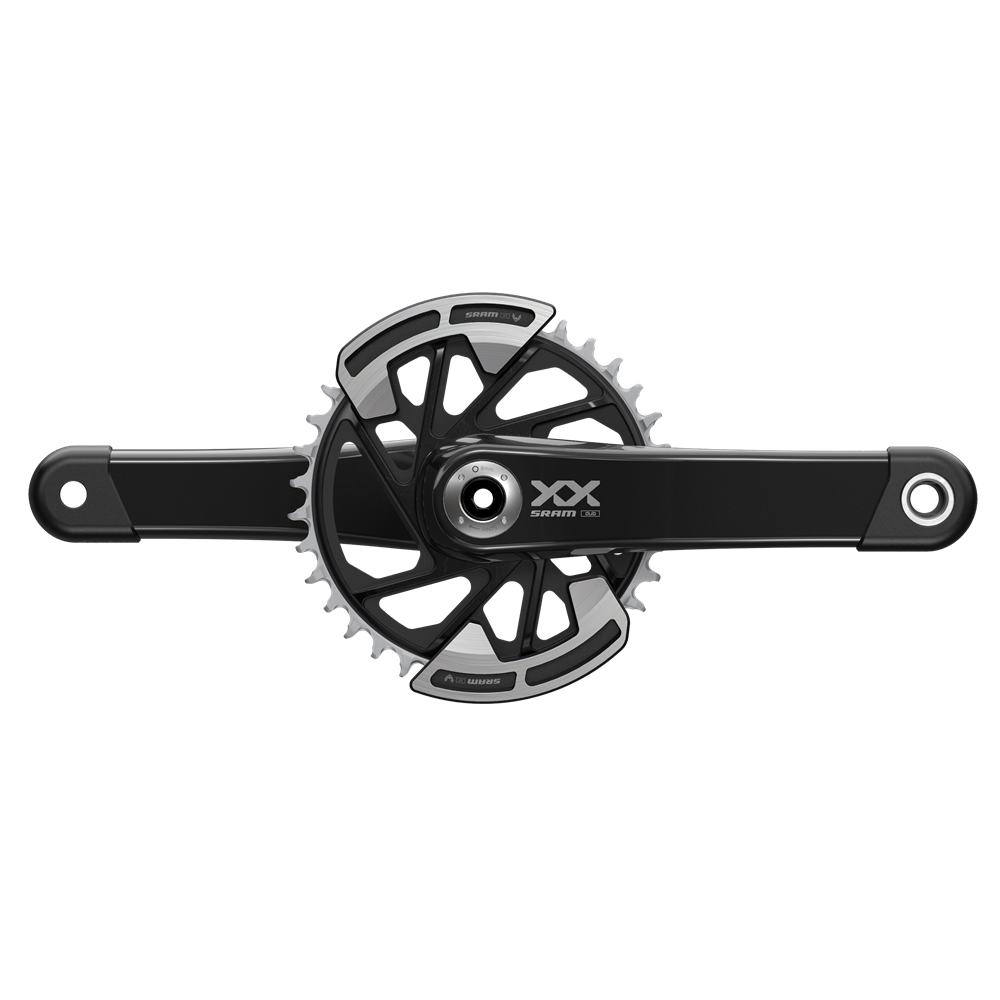
SRAM XX Carbon Eagle, B148, 170mm, 30t
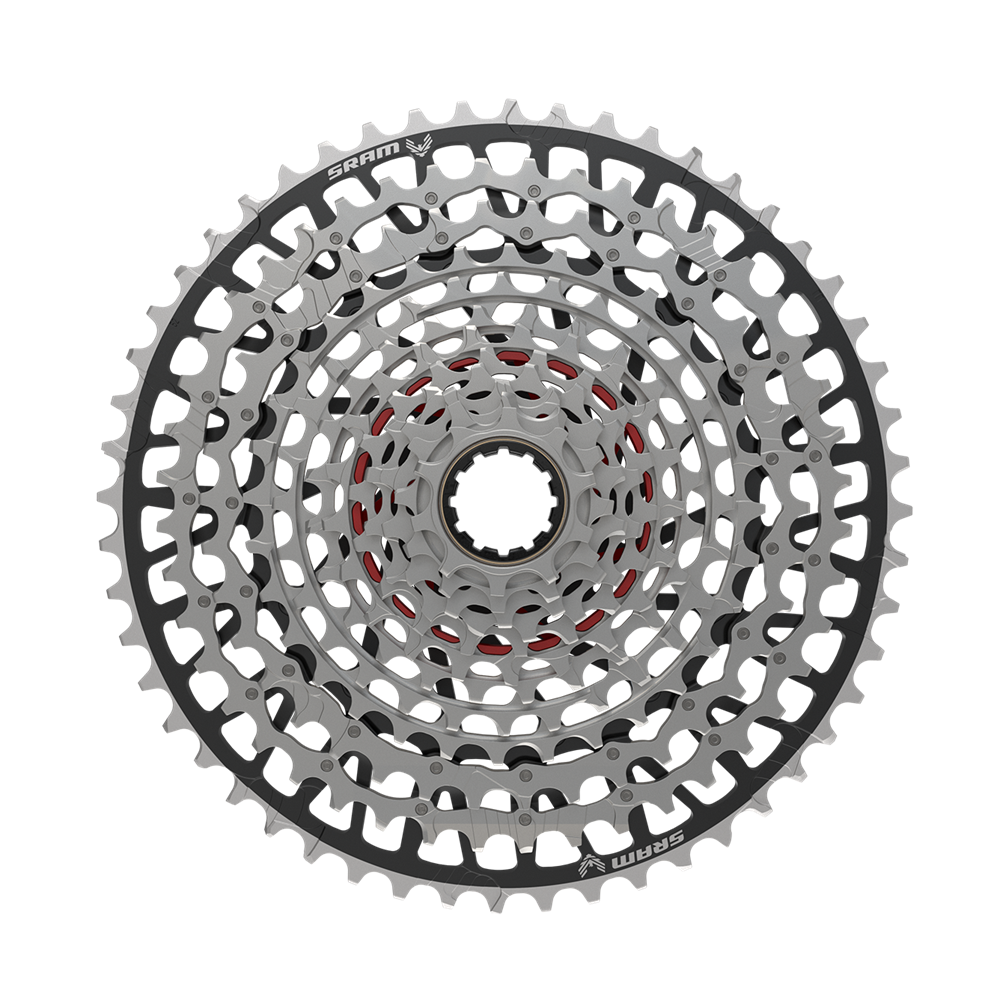
SRAM XX 1297, 12-speed, 10-52t, Black
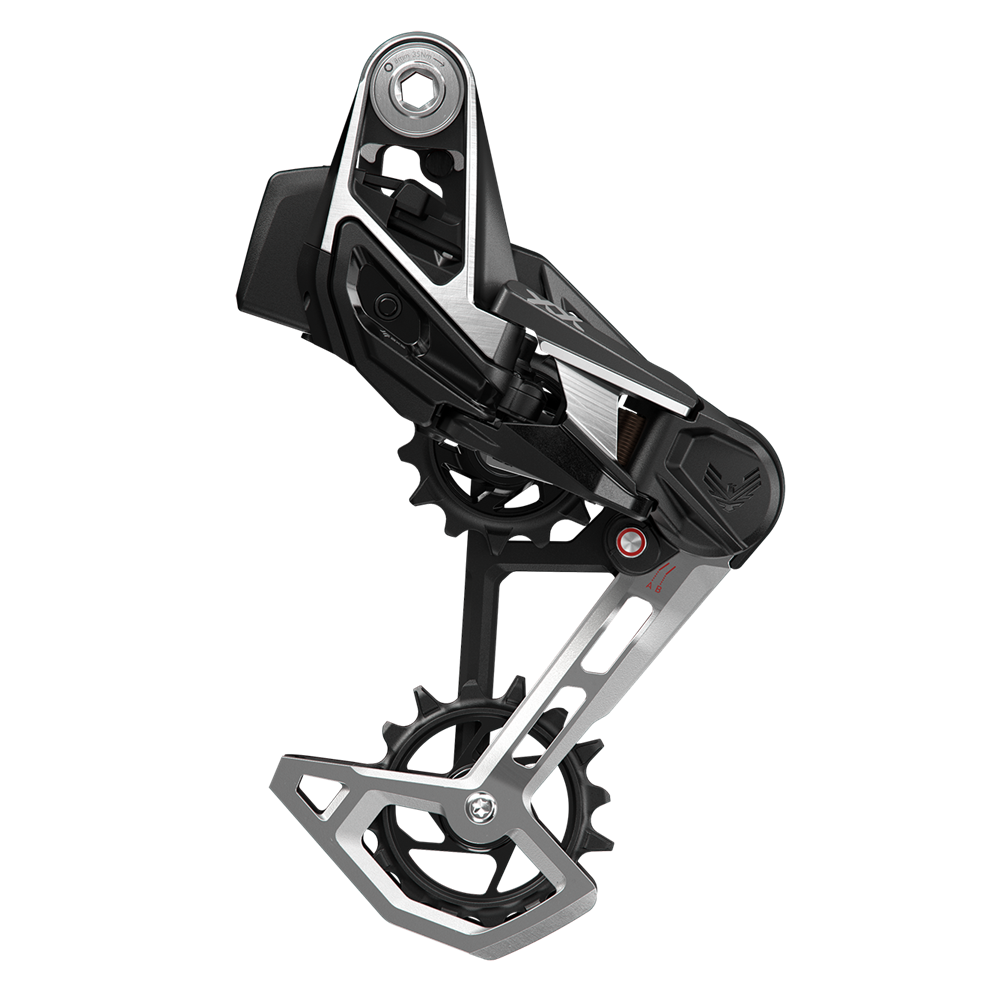
SRAM XX Eagle AXS, Hangerless, Wireless, 12-speed
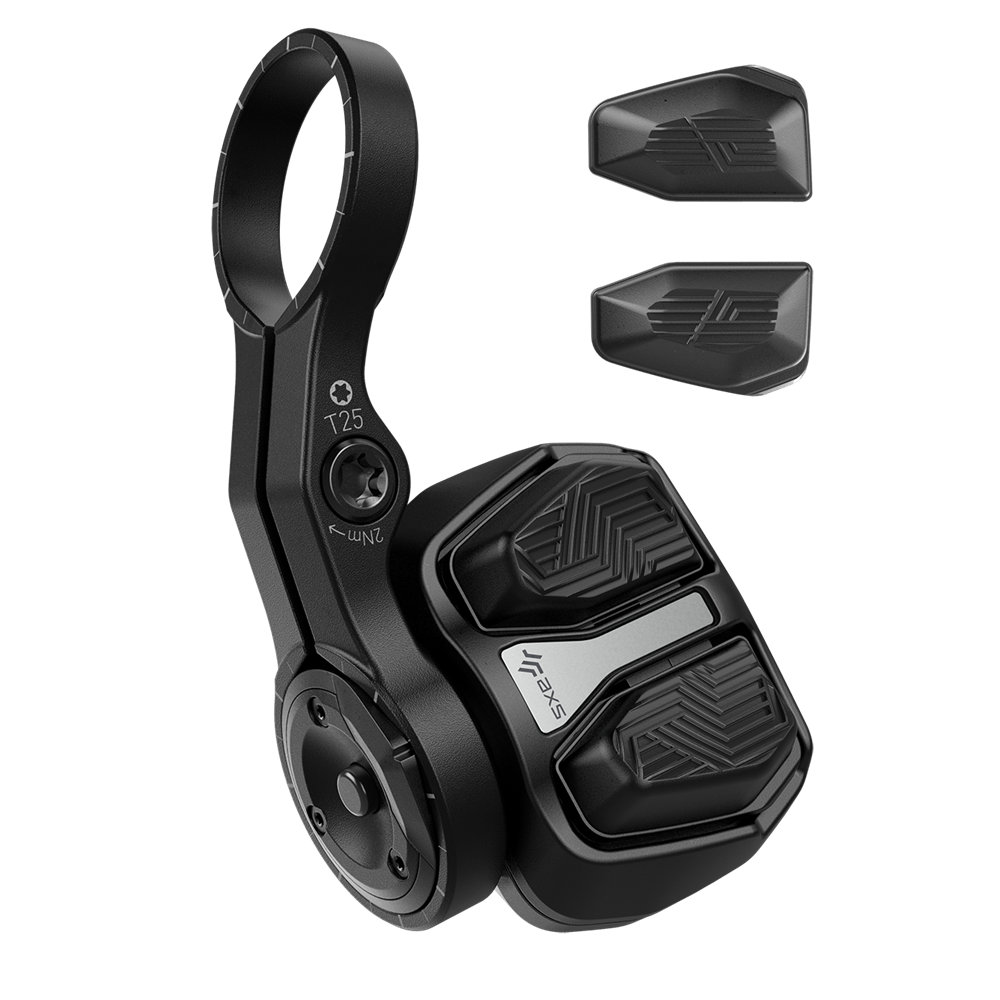
SRAM AXS Pod Controller, 12-speed
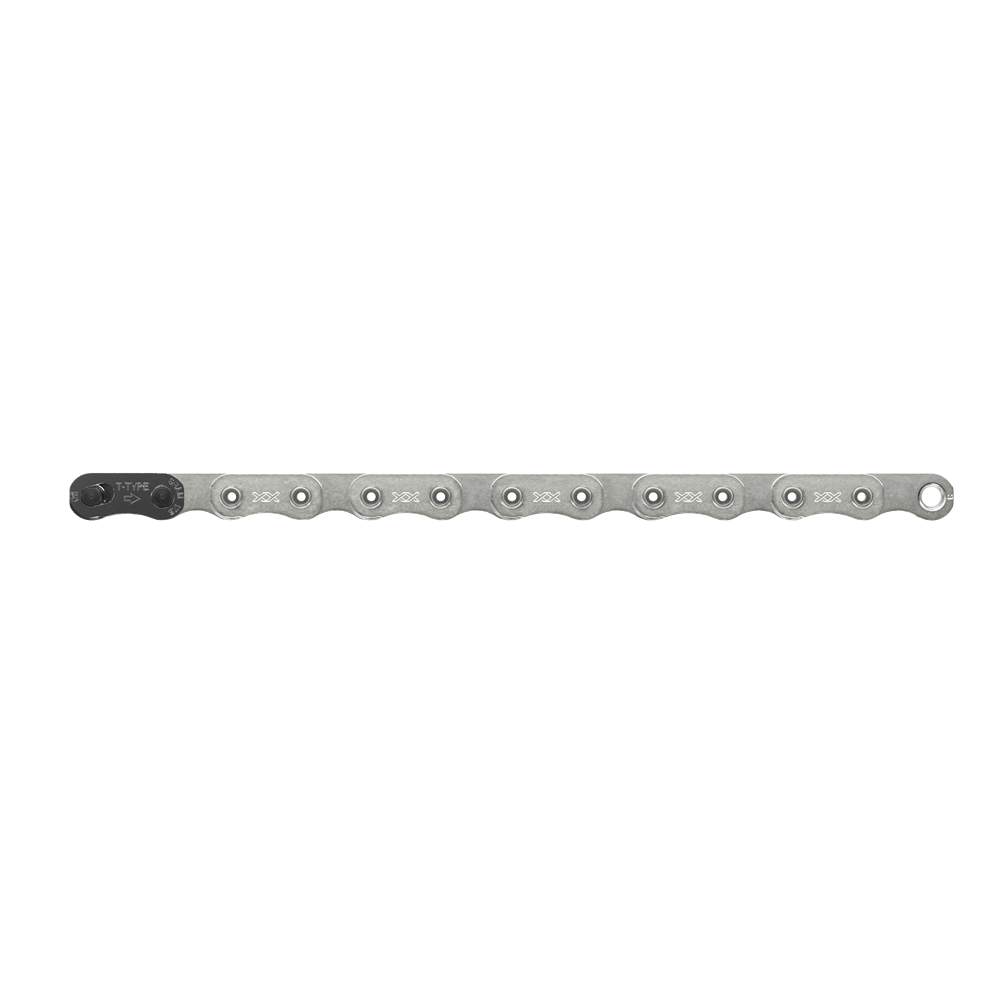
SRAM XX Eagle Flattop, Silver
Fox Factory Float DPS EVOL LV, 3 Pos. Adj., 230x57.5
Fox Factory 36 Float, 29, 140mm, Grip 2, HSC, LSC, HSR, LSR, 44mm rake, Boost
Industry Nine TR300/290 DUO 29, 24h, Tubeless, 6-Bolt, Boost 15x110
27.5+: Industry Nine EN355 27.5, 32h, Tubeless, 6-Bolt, Boost 15x110
Industry Nine TR300/290 DUO 29, 24h, Tubeless, XD, 6-Bolt, Boost 12x148
27.5+: Industry Nine EN355 27.5, 32h, Tubeless, XD, 6-Bolt, Boost 12x148
Cane Creek 40, ZS44/ZS56 ZS44 upper, ZS56 lower
SRAM G2 Ultimate, 4-piston, 180mm, Centerline X, 6-bolt rotor
SRAM G2 Ultimate, 4-piston, 180mm, Centerline X, 6-bolt rotor
Race Face Turbine R, 35 x 50mm
OneUp, 35mm, XL/LG 800mm, MD 760mm, SM 760mm, 20mm rise, Carbon
Ergon GXR
Sram AXS Wireless 170mm for XL and Large, 150mm for Medium, 125mm for Small, 31.6
SDG Bel-Air V3
| 4-Star Build Level | 5-Star Build Level | 6-Star XTR Build Level | 6-Star AXS Build Level | |
| Weight (lbs.) | S: 29.8, M: 29.9, L: 30.0, XL: 30.2 | S: 28.5, M: 28.7, L: 28.9, XL: 29.3 | S: 27.7, M: 27.9, L: 28.2, XL: 28.5 | S: 27.9, M: 28.1, L: 28.4, XL: 28.7 |
| Shock | Fox Factory Float DPS EVOL LV, 3 Pos. Adj., 230x57.5 | Fox Factory Float DPS EVOL LV, 3 Pos. Adj., 230x57.5 | Fox Factory Float DPS EVOL LV, 3 Pos. Adj., 230x57.5 | Fox Factory Float DPS EVOL LV, 3 Pos. Adj., 230x57.5 |
| Fork | RockShox PIKE Select, Boost, 140mm, 42mm rake, 29 | Fox Factory 36 Float, 29, Grip 2, HSC, LSC, HSR, LSR, 140mm, 44mm rake, Boost | Fox Factory 36 Float, 29, Grip 2, HSC, LSC, HSR, LSR, 140mm, 44mm rake, Boost | Fox Factory 36 Float, 29, Grip 2, HSC, LSC, HSR, LSR, 140mm, 44mm rake, Boost |
| Headset | Cane Creek 40, ZS44/ZS56 ZS44 upper, ZS56 lower | Cane Creek 40, ZS44/ZS56 ZS44 upper, ZS56 lower | Cane Creek 40, ZS44/ZS56 ZS44 upper, ZS56 lower | Cane Creek 40, ZS44/ZS56 ZS44 upper, ZS56 lower |
| Crankset | SRAM Stylo Eagle, B148, DUB, 170mm, 32t | SRAM GX Eagle Transmission, B148, 170mm, 32t | Shimano M9120 XTR, 170mm, 32t | SRAM XX Carbon Eagle, B148, 170mm, 30t |
| Cassette | SRAM XG1275, 12-speed, 10-52t | SRAM GX Transmission 1275, 12-speed, 10-52t | Shimano XTR 9100, 12-speed, 10-51t | SRAM XX 1297, 12-speed, 10-52t, Black |
| Rear Derailleur | SRAM GX Eagle, 12-speed | SRAM GX Eagle AXS Transmission, Wireless, Hangerless, 12-speed | Shimano XTR 9100, 12-speed | SRAM XX Eagle AXS, Hangerless, Wireless, 12-speed |
| Rear Shifter Lever | SRAM GX Eagle Lunar, 12-speed, Trigger | SRAM Eagle AXS Rocker Controller, 12-speed | Shimano XTR 9100, 12-speed, Rapidfire Plus | SRAM AXS Pod Controller, 12-speed |
| Bottom Bracket | SRAM DUB BSA 73mm threaded | SRAM DUB BSA 73mm threaded | Shimano SM-BB93 BSA 73mm | SRAM DUB BSA 73mm threaded |
| Front Brake | SRAM G2 R, 4-piston, 180mm, Centerline, 6-bolt rotor | SRAM G2 RSC, 4-piston, 180mm, Centerline, 6-bolt rotor | Shimano XTR 9120, 4-piston, 180mm, 6-bolt rotor | SRAM G2 Ultimate, 4-piston, 180mm, Centerline X, 6-bolt rotor |
| Rear Brake | SRAM G2 R, 180mm, 4-piston, Centerline, 6-bolt rotor | SRAM G2 RSC, 180mm, 4-piston, Centerline, 6-bolt rotor | Shimano XTR 9120, 4-piston, 180mm, 6-bolt rotor | SRAM G2 Ultimate, 4-piston, 180mm, Centerline X, 6-bolt rotor |
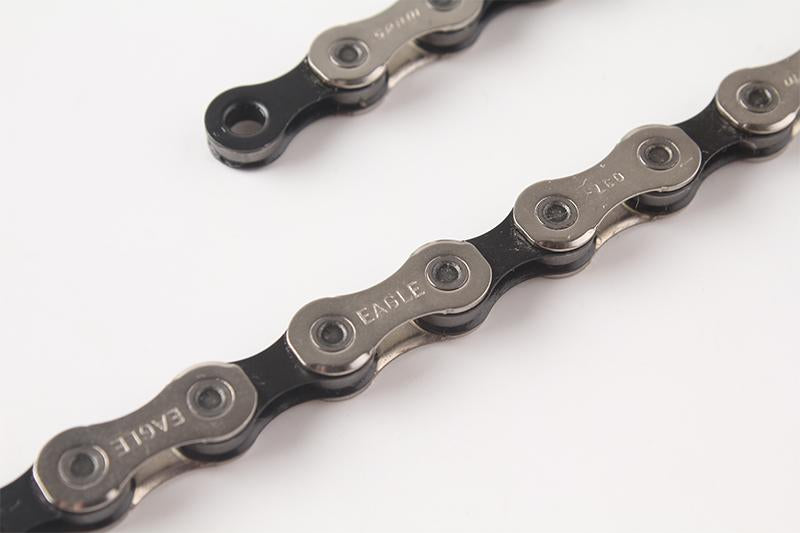
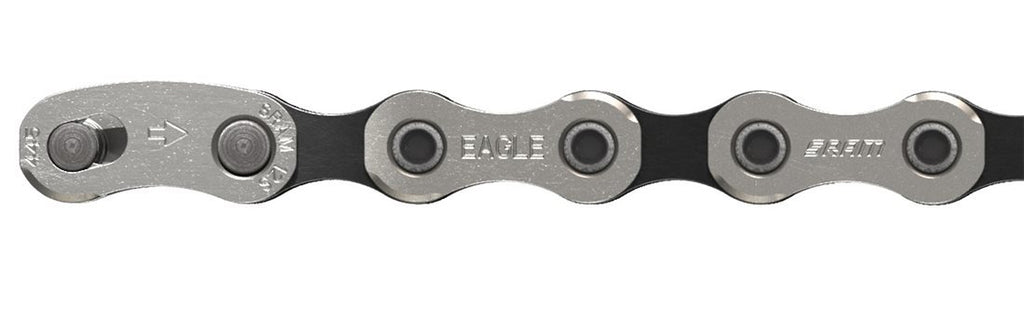
| Chain | SRAM GX Eagle | SRAM GX Eagle, Flattop, Silver | Shimano XTR 9100 | SRAM XX Eagle, Flattop, Silver |
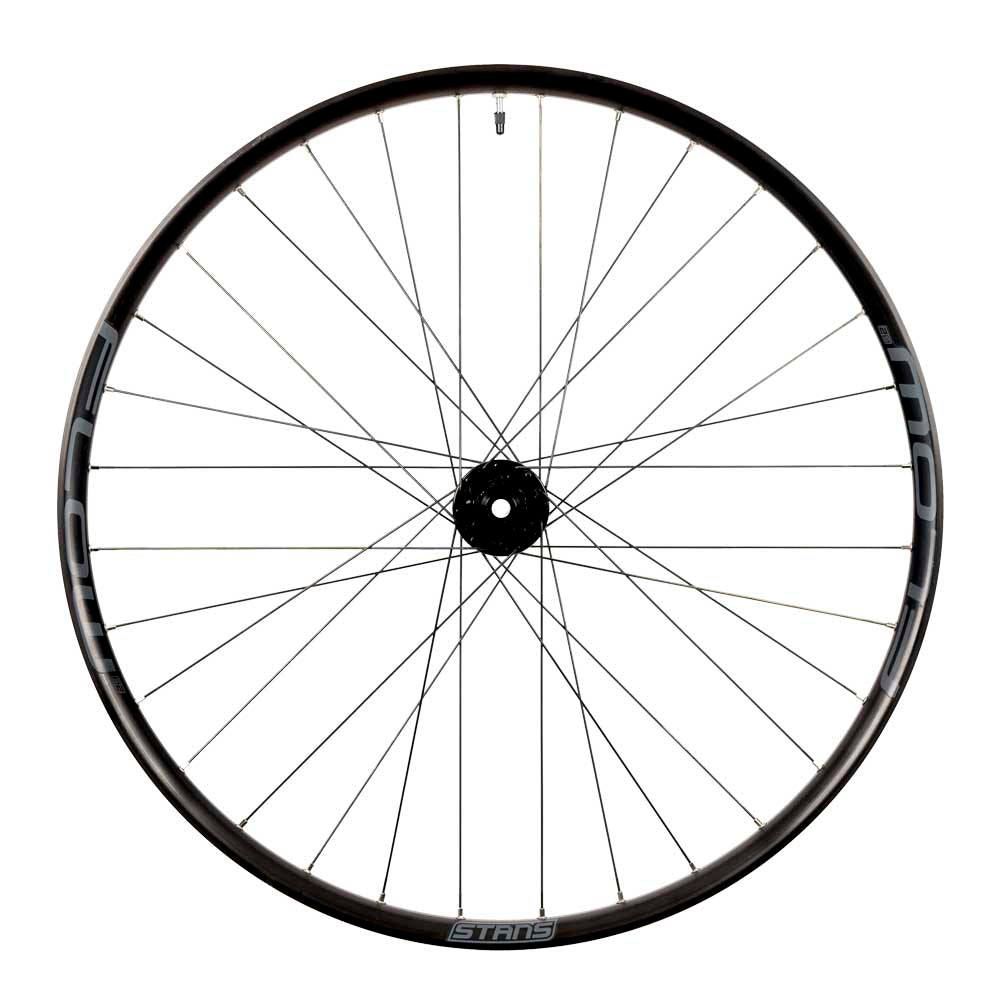
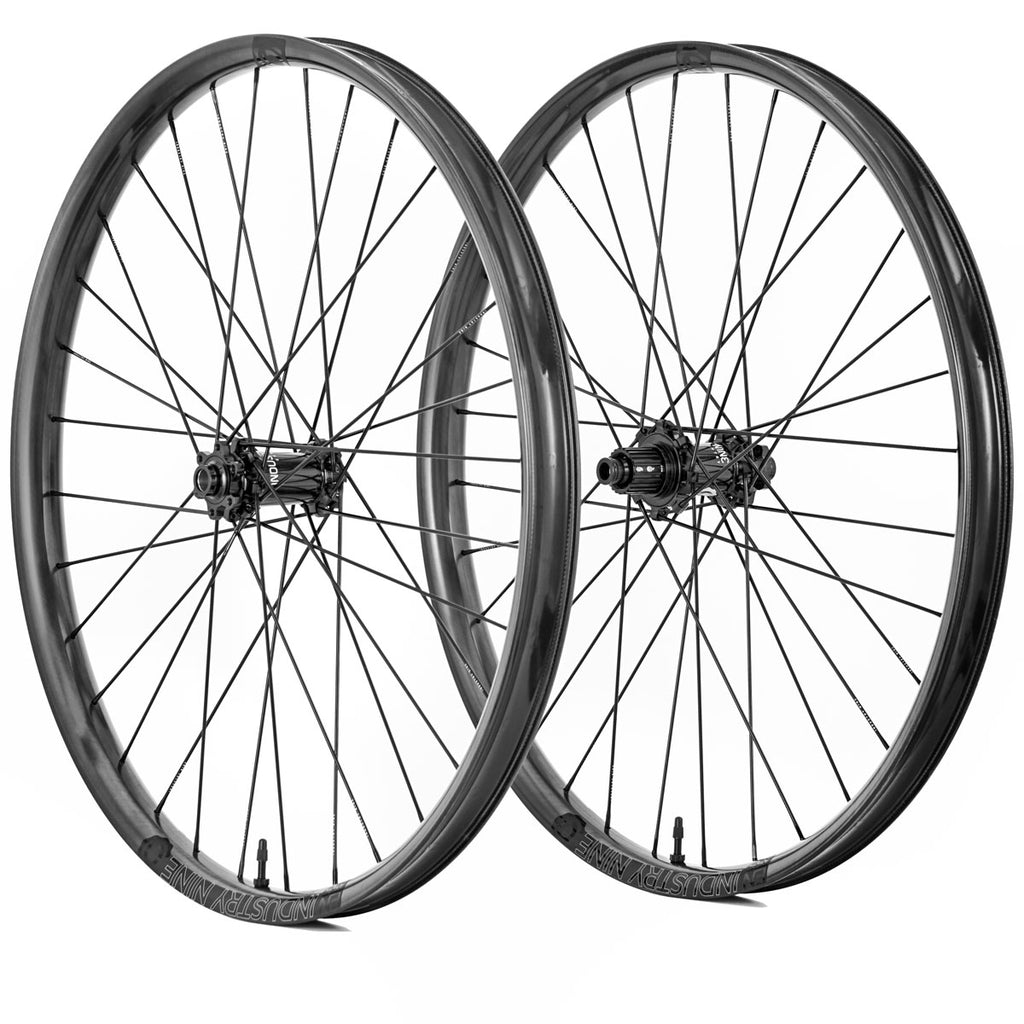
| Front Wheel | 29: Stan's Arch S2 Pro 29, Tubeless, Boost 15x110, 6-bolt. 27.5+: Stan's Flow S2 27.5+, Tubeless, Boost 15x110, 6-bolt. | 29: Industry Nine Enduro S 29, 1/1 hub, Tubeless, Boost 15x110, 6-bolt. 27.5+: Stan's Flow MK4 27.5+, Tubeless, Boost 15x110, 6-bolt. | 29: Industry Nine TR300/290 DUO 29, 24h, Tubeless, 6-Bolt, Boost 15x110, 27.5+: Industry Nine EN355 27.5, Tubeless, 6-Bolt, Boost 15x110 | 29: Industry Nine TR300/290 DUO 29, 24h, Tubeless, 6-Bolt, Boost 15x110, 27.5+: Industry Nine EN355 27.5, Tubeless, 6-Bolt, Boost 15x110 |
| Rear Wheel | 29: Stan's Arch S2 Pro 29, Tubeless, Boost 12x148, XD, 6-bolt. 27.5+: Stan's Flow S2 27.5+, Tubeless, Boost 12x148, XD, 6-bolt. | 29: Industry Nine Enduro S 29, 1/1 hub, Tubeless, Boost 12x148, XD, 6-bolt. 27.5+: Stan's Flow MK4 27.5+, E-Sync, Tubeless, Boost 12x148, XD, 6-bolt. | 29: Industry Nine TR300/290 DUO 29, 24h, Tubeless, Microspline, 6-Bolt, Boost 12x148, 27.5+: Industry Nine EN355 27.5, Microspline, Tubeless, 6-Bolt, Boost 12x148 | 29: Industry Nine TR300/290 DUO 29, 24h, Tubeless, XD, 6-Bolt, Boost 12x148, 27.5+: Industry Nine EN355 27.5, XD, Tubeless, 6-Bolt, Boost 12x148 |
| Front Tire | Maxxis Minion DHF 29x2.3, 60tpi, 3C Maxx Terra, 27.5+: Maxxis Rekon Plus 27.5x2.8 60tpi Dual EXO/TR | Maxxis Minion DHF 29x2.3, 60tpi, 3C Maxx Terra, 27.5+: Maxxis Rekon Plus 27.5x2.8 60tpi Dual EXO/TR | Maxxis Minion DHF 29x2.3, 60tpi, 3C Maxx Terra, 27.5+: Maxxis Rekon Plus 27.5x2.8 60tpi Dual EXO/TR | Maxxis Minion DHF 29x2.3, 60tpi, 3C Maxx Terra, 27.5+: Maxxis Rekon Plus 27.5x2.8 60tpi Dual EXO/TR |
| Rear Tire | 29: Maxxis Minion DHR 2 29x2.3, 60tpi, Dual EXO/TR, 27.5+: Maxxis Rekon Plus 27.5x2.8 60tpi Dual EXO/TR | 29: Maxxis Minion DHR 2 29x2.3, 60tpi, Dual EXO/TR, 27.5+: Maxxis Rekon Plus 27.5x2.8 60tpi Dual EXO/TR | 29: Maxxis Minion DHR 2 29x2.3, 60tpi, Dual EXO/TR, 27.5+: Maxxis Rekon Plus 27.5x2.8 60tpi Dual EXO/TR | 29: Maxxis Minion DHR 2 29x2.3, 60tpi, Dual EXO/TR, 27.5+: Maxxis Rekon Plus 27.5x2.8 60tpi Dual EXO/TR |
| Stem | Race Face Aeffect, 35 x 50mm | Race Face Turbine R, 35 x 50mm | Race Face Turbine R, 35 x 50mm | Race Face Turbine R, 35 x 50mm |
| Handlebar | Race Face Aeffect R, 35mm, XL/LG 780mm, MD 760mm, SM 750mm, 20mm rise, Alloy | OneUp, 35mm, XL 800mm, LG 780mm, MD 760mm, SM 750mm, 20mm rise, Carbon | OneUp, 35mm, XL 800mm, LG 780mm, MD 760mm, SM 750mm, 20mm rise, Carbon | OneUp, 35mm, XL 800mm, LG 780mm, MD 760mm, SM 750mm, 20mm rise, Carbon |
| Grips | Ergon GXR, Black | Ergon GXR, Black | Ergon GXR, Black | Ergon GXR, Black |
| Seat Post | BikeYoke Revive 185mm for XL and Large, 160mm for Medium, 125mm for Small, Internal, 31.6 | BikeYoke Revive 185mm for XL and Large, 160mm for Medium, 125mm for Small, Internal, 31.6 | BikeYoke Revive 185mm for XL and Large, 160mm for Medium, 125mm for Small, Internal, 31.6 | Sram AXS Wireless 170mm for XL and Large, 150mm for Medium, 125mm for Small, 31.6 |
| Saddle | SDG Bel-Air V3 | SDG Bel-Air V3 | SDG Bel-Air V3 | SDG Bel-Air V3 |
See this diagram for an explanation of Mayhem geometry terms.
| Frame Size | Small | Medium | Large | X-Large |
| Reach | 415mm (16.3") | 440mm (17.3") | 465mm (18.3") | 490mm (19.3") |
| Stack | 597mm (23.5") | 612mm (24.1") | 626mm (24.6") | 635mm (25.0") |
| Eff. Top Tube Length | 569mm (22.4") | 593mm (23.3") | 615mm (24.2") | 637mm (25.1") |
| Seat Tube Length | 356mm (14.0") | 407mm (16.0") | 457mm (18.0") | 495mm (19.5") |
| Head Tube Length | 90mm (3.5") | 105mm (4.1") | 120mm (4.7") | 130mm (5.1") |
| Head Tube Angle | HI 65.7°, LOW 65.2° | HI 65.7°, LOW 65.2° | HI 65.7°, LOW 65.2° | HI 65.7°, LOW 65.2° |
| Effective Seat Tube Angle | 75.5° | 76.0° | 76.5° | 77.0° |
| Actual Seat Tube Angle | 71.8° | 72.6° | 73.5° | 74.3° |
| Bottom Bracket Drop | HI 31mm (1.2"), LO 39mm (1.5") | HI 31mm (1.2"), LO 39mm (1.5") | HI 31mm (1.2"), LO 39mm (1.5") | HI 31mm (1.2"), LO 39mm (1.5") |
| Est. Bottom Bracket Height | 29: HI 344mm (13.5"), 29 LO 336mm (13.2"). 27.5+: HI 337mm (13.3"), 27.5+ LO 329mm (13.0") | 29: HI 344mm (13.5"), 29 LO 336mm (13.2"). 27.5+: HI 337mm (13.3"), 27.5+ LO 329mm (13.0") | 29: HI 344mm (13.5"), 29 LO 336mm (13.2"). 27.5+: HI 337mm (13.3"), 27.5+ LO 329mm (13.0") | 29: HI 344mm (13.5"), 29 LO 336mm (13.2"). 27.5+: HI 337mm (13.3"), 27.5+ LO 329mm (13.0") |
| Rear Center | 435mm (17.1") | 435mm (17.1") | 435mm (17.1") | 435mm (17.1") |
| Front Center | 719mm (28.3") | 750mm (29.5") | 782mm (30.8") | 811mm (31.9") |
| Wheel Base | 1154mm (45.4") | 1185mm (46.7") | 1217mm (47.9") | 1246mm (49.1") |
| Standover | 707mm (27.8") | 707mm (27.8") | 707mm (27.8") | 707mm (27.8") |

The Living Link™ system re-imagines and reinvents full-suspension technology to provide riders with multiple benefits over conventional systems. Read More

Leaf Spring is partially flexed, adding support in the beginning of the sag range.

"I fell in love with it instantly, and that love only got deeper as I rode it more and stronger as I rode other bikes. For what it’s worth, this is my favorite mountain bike right now, and the one bike I’d keep if I had to get rid of the others."
![]()
"Both the Mayhem 130 and Mayhem 150 are incredible trail bikes, which I would put again at the top of my favorite-bikes-of-all-time list."
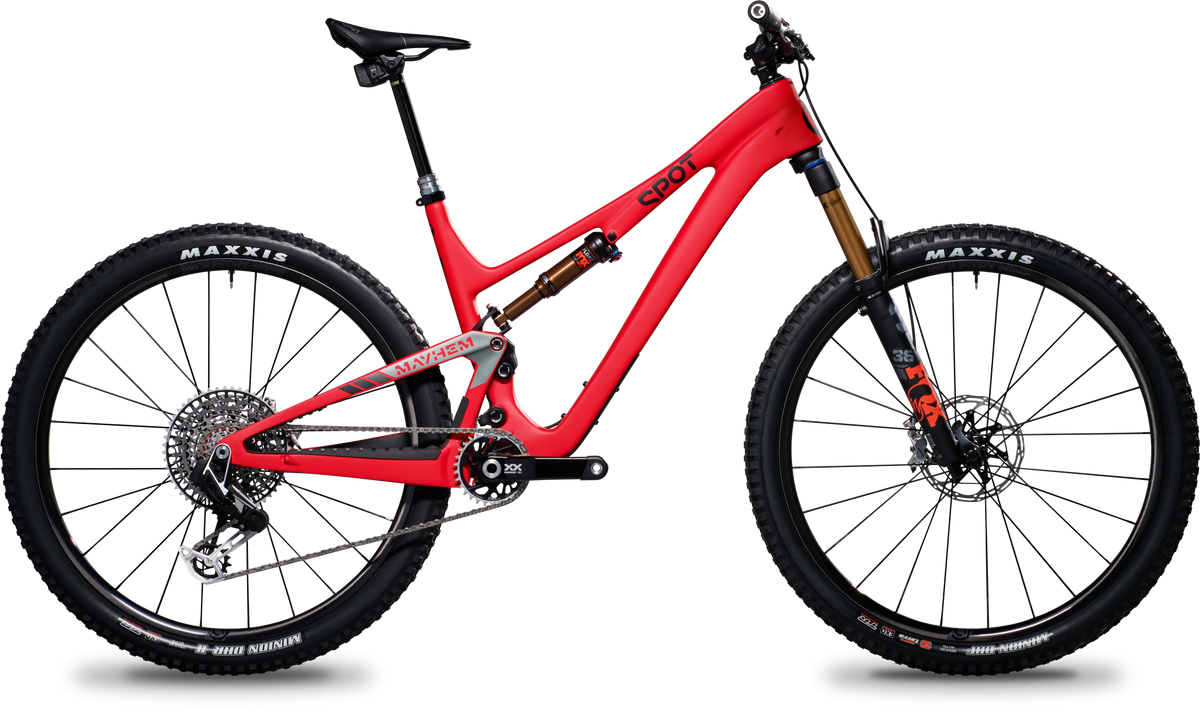
All mountain bikers want to ride farther faster, but often the only thing holding them back is their bike. The Mayhem 130 helps confident descenders climb more efficiently and fast climbers descend with more control and flow, enabling all types of riders to cover more ground—both up and down.
At the heart of the 130’s high performance is Spot’s patented Living Link™ suspension platform and its aerospace-grade titanium leaf spring, which improves pedaling efficiency, provides a laterally and torsionally stiff linkage between the front and rear triangles for precision carving, and eliminates chain growth deep in the stroke for improved power delivery—all while reducing maintenance. We embed Living Link™ in a light and strong carbon frame whose long, low, and slack geometry combined with a steep seat tube centers the rider’s weight in the most athletic power position, right between the front and rear axles for maximum control.
The bike’s carbon frame is designed to minimize weight and maximize strength, with a super-low top tube for stand over clearance and maneuverability, a short seat tube that accommodates long dropper posts, and a Geometry Adjuster that, in less than 30 seconds, lets riders slacken the head tube angle and lower the bottom bracket for stability in high speed turns.
Advanced materials science, improved pedaling and handling, versatility and optimized geometry all combine to create a bike that enhances your riding strengths, minimizes your weaknesses, and enables you to channel your inner mayhem.
The beating heart of the Mayhem’s ride performance is the titanium leaf spring technology that has won our patented Living Link™ suspension platform numerous accolades and awards. The animation above helps to visualize the special qualities of Living Link™ and its ability to store and release energy that boosts pedaling performance. At rest (or when airborne), the Living Link™ leaf spring is relaxed. As the suspension compresses, the leaf spring begins to flex, supporting the rider and widening the sag sweet spot. As the leaf spring continues to flex it stores energy that assists the system’s compression until, at full-bottom-out and maximum compression, it returns to a relaxed state. As the bike’s suspension enters its rebound phase, the leaf spring goes from relaxed to partially flexed, storing and controlling rebound energy. Midway through the rebound, the leaf spring is fully flexed, a position in which it is fully loaded up with rebound energy. As the rebound continues toward its relaxed state, it releases that stored energy to provide a slight power boost.
Living Link™ also addresses a flaw of typical suspension systems: lateral and torsional flex. The titanium leaf spring, which is manufactured locally by a Colorado aerospace components manufacturer, is extremely stiff laterally and firm torsionally. Think about a metal ruler. It is easy to bend across its flat surface but tipped on edge that ruler is virtually impossible to bend. What that means is the Mayhem carves hard, with a solid connection between the front and rear triangles.
The Mayhem’s frame shape is driven by a Force-Response design philosophy. We shaped and engineered the bike’s frame based on detailed analysis and testing both in the lab and on the trail. The result is a bike that heightens pedaling efficiency, maximizes strength and durability, and focuses material in areas where it is most needed while minimizing material (and weight) where a streamlined design improves performance and efficiency.
The forward portion of the top tube is shaped to quietly communicate and diffuse the large compressive forces this area of the bike absorbs, while the rearward portion is slimmed to handle the smaller forces delivered through the seat tube. The upper control link has been designed to deliver superb suspension response, precise shock control and excellent torsional stiffness, all while minimizing stress on the seat tube structure.
The twin-strut rear swingarm supports the crucial connections between the front and rear triangles and manages the intense energetic loads generated by the rear wheel, while remaining slim and compact for reduced un-sprung inertia. The main pivot yoke, connected to the titanium leaf spring, spreads the Enduro dual-row full-complement bearings as wide as possible for maximum durability and prolonged bearing life. Tires are crucial to bike handling and frame performance. We shaped the chain stays and seat stays to give the Mayhem loads of clearance for wide-diameter tires up to 29x2.5” (and 27.5x2.8”), with some 29x2.6” tires working as well.
In totality, the Mayhem frame is one of the most advanced, efficient, durable, low-maintenance, and fast mountain bike frames on the market.
The Mayhem’s geometry illustrates our firm belief that a bike should maximize a rider’s strengths and minimize their weaknesses. It should put them in the most athletic position to succeed in a variety of trail conditions, allowing riders to cover ground more easily. We designed the Mayhem to place the rider’s weight precisely between the front and rear wheels. We accomplish this by extending the measurement between the bottom bracket and front axle, by slackening the head tube angle for better handling on steep and rough terrain, and by steepening the seat tube angle. This geometry eliminates front-end lift during seated climbing but provides ample room to move and shift your weight when descending. All of this means you spend less energy balancing your bike, allowing you to feel fresh and juiced up for bursts of power when climbing. The Mayhem’s geometry improves the rider’s performance at all speeds, up and down, slow or fast, on all terrain, so that you can explore more, ride more, extend your range and cover more ground. Because every extra summit bagged means another thrilling descent.
Kinematics are the properties of an object in motion. We engineered the Mayhem to have an energetic pedaling response, but with reduced chain growth deep in the stroke for uninterrupted power delivery in rough terrain. In nerd speak we describe this as a seamless progressive leverage ratio: Soft off the top, ample mid stroke support from the leaf spring, and ramp at the end to prevent hard bottoming and soak up big hits. The Mayhem’s kinematics eliminate the need for shock lockout due to the power boost provided by our Living Link™ suspension. All of this means that climbing takes less energy and more watts are sent to the wheel with every pedal stroke.
Full shralp mode is only a few moments away with our Geometry Adjuster which lets the rider swap between HI and LO modes in less than 30 seconds with one tool. Slacker, lower, shreddier. Adjust it on the trail or set it and forget it. Our goal is to provide riders with options that allow them to tailor and fine-tune their Mayhem to their riding style. It’s like getting two bikes for the price of one.
Cable lines on a beautifully shaped bike frame are kind of like those overhead power lines that ruin your view of the sky: they are butt ugly and could easily be hidden with some effort. Our Groovy Guides integrate the rear brake line into the tube, providing a clean look while also offering easier access than internal cable routing. Our Groovy Guides make it easy to service what may be the most important cable on your bike, while also keeping it out of the way and eliminating snags. It’s just one more example of how we sweat the small details to enhance your ride performance.
We design and test our frames to the highest standards so you can be confident in your investment. Should you have an issue with your Spot frame, we will warranty it against manufacturing defects for the lifetime of the frame. Of course there's some fine print (read here), but if you buy a bike and ride it as it is intended to be ridden, we've got your back. And if you do get into a fender-bender, we have a fantastic crash replacement program as well.


Incredible bike!
Arrived in a well protected and organized package and in big pieces that were easy to assemble. You can tell these guys take pride in their work. Rides so smooth and it’s very durable.
Because it is winter and I’m in the mountains of western Colorado, I’ve only been able to ride once. Having said that, the bike immediately impressed me and I took it on one of our more rowdy loops. It’s heavier than my old XC race bike but I didn’t feel it because it climbed so efficiently. Coming back down was awesome and a marked improvement over my previous bike (Pivot 429 SL)…. I’m a skier and I’m happy ski season is here, but I’m already looking forward to spring riding and getting to know the Mayhem!
Even know it’s heavier than I expected ( it weighs more than my 140-150 travel Rocky Mountain. I have only ridden it 2 times at this point with many little differences that take a little time to get used to it climbs well and decends really well feels really solid on everything. I like it!

The Mayhem 130 has surpassed my expectations in both climbing and descending categories! The living link is a living legend, providing responsive and lively suspension at trail speed, feeling locked out on grunt climbs, and feeling bottomless on big hucks or rocky chunder. As always, Spot customer service sealed the deal and earns the rounding out of a 5-star experience!


